Thursday, November 10, 2011

Cinnamon Roll Pancakes

My kids wanted breakfast for dinner so we decided to try these pancakes I heard about.. I'm not sure you could actually call it dinner, but they were fabulous!  Enjoy!

Cinnamon Roll Pancakes

Pancakes:
The easiest thing to do is make your favorite pancake mix and add the cinnamon swirl while cooking.. If you don't use mixes, here is a pancake recipe:

1 C flour
2 tsp baking powder
1/2 tsp salt
1 C milk
1 T oil
1 egg

Mix all ingredients together and set aside..


Cinnamon swirl:
1/2 C melted butter
3/4 C brown sugar
1 T cinnamon

Mix together and put into ziploc baggie.

Cream Cheese Glaze:
4 T butter
2 oz cream cheese
3/4 C powdered sugar
1/2 t vanilla

Melt butter and cream cheese.  Whisk in sugar and vanilla until smooth.


Heat griddle over medium-low heat.  Spray with cooking spray.  I used a 1/2 cup measuring cup and poured batter onto hot griddle.  Snip end of ziploc baggie (with cinnamon swirl mix) and swirl around onto pancake.  (keep a bowl close to put baggie in or you will have a huge mess!)  When pancake bubbles, carefully flip - get the largest spatula out that you own! Cook 1-2  more minutes and remove from heat. 
 Serve with warm cream cheese glaze! 


(You definitely won't need butter or syrup on these!
 Enjoy then go run a few miles to work it off!! :)

Tuesday, November 8, 2011

Cranberry Relish


This relish is easily the fastest way to "WOW" a crowd! I'd had this at family gatherings but had never made it - mostly because my husband loves cranberries, but is allergic to them. I had to track down the recipe which originated with my niece, Donna. Without tasting it, you may wonder about the ingredient list - but trust me, it's amazing!


This past weekend, I hosted a bridal shower and made this as part of the luncheon. More than half of those attending asked for the recipe!

For all who asked, and those who didn't - here ya go.... Super Easy Cranberry Relish


1 12oz bag of fresh cranberries
1 c sugar
4-5 green onions
cilantro (about 2/3 of a bunch or about 1/4 cup chopped)*
2 seeded jalapenos
2 8oz packages of cream cheese
crackers (prefer Wheat Thins)

Rinse cranberries and pat dry. Place in food processor and pulse until finely chopped. Transfer to mixing bowl. I chopped the green onions, cilantro, and jalapenos until very fine, but next time I will try them in the food processor, too. Combine veggies with cranberries, then add sugar, and mix well. Refrigerate at least an hour for flavors to mix. Serve over cream cheese. Enjoy!!

*Cilantro note: I've always wondered the best way to chop cilantro. My sister once told me to cut all fresh herbs with scissors, but that can be tricky. While making this relish, I searched for a better solution and found this video: http://www.youtube.com/watch?v=EuRhkopm06A. I found it very helpful - especially about what part to use!

Friday, October 21, 2011

Pumpkin Chocolate Chip Cookies

When the weather starts to get cooler, and the leaves begin to turn colors, the first thing I want to do is bake something with pumpkin! I know - it's a weird thing, but I can't help myself! Try to get me to use pumpkin in the spring and summer, and you'll find that it just won't happen.

Since it's a very busy weekend, and the fact that I've been experimenting with recipes that start with chocolate chip cookie mixes, I varied from my normal Pumpkin Chocolate Chip cookie recipe. To simplify my life, I started with a Sisters' Gourmet chocolate chip cookie mix to make these yummy cookies. Any cookie mix may work, but I've only tried this one, so far.

Here's the recipe:
1 jar of Sisters' Gourmet chocolate chip cookie mix
2 eggs
1 1/2 sticks (12 tbsp) softened butter
1/2 tsp each of cinnamon, nutmeg, and cloves
1 tsp vanilla
1 15 oz can of pumpkin

Just put everything in a large bowl and mix! How easy is that! I used my KitchenAid mixer.

Scoop about 1 1/2 inch balls onto baking sheets and bake at 350 for 10-12 minutes, or until you can gently press on the cookie, and it doesn't make a dent (bounces back).

Cool on pan, then frost if desired. My good friend and master cookie baker, Julie Chambers, taught me that Pumpkin Chocolate Chip Cookies should always have a little bit of frosting on top. I'm not sure why this is so, but you can't go wrong with frosting! And, you can't go wrong with any cookie that Julie makes! :)

It's just a simple frosting of:
1 stick (8 tbsp) butter
4 cups powdered sugar
4 tbsp milk
1 tsp vanilla

Enjoy!!

Monday, October 17, 2011

Triple Layer Chocolate Chip Cheesecake Bars

Yes, this is another chocolate chip cookie dough project. I have a few more ideas that may show up on this blog, as well, so keep watching for them!

This is a variation of the peanut butter filling bars from a few days ago. Basically, these have a cheesecake filling instead of peanut butter. I know what you're thinking - rocket science! I never said my recipes were complicated - just that they are rich and tasty!


You will need:
about 3 cups of chocolate chip cookie dough
1 8oz pkg cream cheese, softened
1/3 cup sugar
1 egg
1 tsp vanilla

Prepare a 9x9 baking pan with vegetable oil spray. Preheat oven to 350. Spread about 1/2 of the cookie dough into the bottom of the prepared pan. Mix the remaining ingredients and pour over the cookie dough. Finally, crumble the other 1/2 of cookie dough over the cheesecake mixture. Bake for about 30 minutes, or until golden on top. Cool completely before cutting.

We ate them both warm and cold, and definitely preferred the chilled version.

As for the peanut butter vs. cheesecake filling preference, it was a mixed review. The peanut butter was a lot richer, but the cheesecake was quite good, too. I guess in the end, I would say that the PB won - mainly because none of us preferred the cheesecake, but just said it was "as good" as the pb, whereas the pb got a couple of favorite votes. So, there you have it! Enjoy!!

Friday, October 14, 2011

Triple Layer Chocolate Chip Bars with Peanut Butter Filling


Sisters' Gourmet is in full swing this time of the year, getting our cookie mixes produced and shipped out for fall baking. With production comes the "reject table"! You may think of this as a bad thing, but it's really not. Pam, our Quality Control Manager, is very good at what she does! Among many other things she is watching for, she makes sure our layered cookie mixes always LOOK good in the jar. If the layers are in disarray, or it otherwise just doesn't look nice, she rejects the jar. Hence the reject table.

Each of us takes home cookies from the reject table to bake for friends, neighbors, family (of course), and we give some away to anyone else who deserves cookies that day (i.e. truck drivers, vendors, etc.). Now, don't take this wrong, but sometimes I get tired of baking the same cookies. It's not that I won't EAT the same cookie day after day, but I like to be creative when I'm baking them.

Long story short.....I'm going to be exploring other recipes that use basic chocolate chip cookie dough, since that's what is on the reject table this week. Today's recipe uses about 3 cups of prepared chocolate cookie dough, but it can easily be adjusted to use more or less. I will just list the cookie dough as an ingredient. Of course, you can substitute your favorite recipe, some refrigerated dough, or mix up a Sisters' Gourmet cookie mix!

Super easy.......You will need:
about 3 cups of chocolate chip cookie dough
1 1/2 cups peanut butter
1 1/2 cups powdered sugar
1 1/2 tsp. vanilla

Prepare a 9x9 baking pan with vegetable oil spray. Preheat oven to 350. Spread about 1/2 of the cookie dough in the bottom of the prepared pan. Mix the remaining ingredients (will be thick) and spread over the cookie dough. Now, crumble (or spread, depending on the consistency of your dough) the other 1/2 of dough over the peanut butter mixture. Bake for about 30 minutes, or until golden on top. Cool completely before cutting unless you enjoy a peanut butter and chocolately mess!


I've got a crowd over tonight, and everyone is loving these bars! The best way to describe them is that they are something like a peanut butter bon bon surrounded by chocolate chip cookie. Enjoy!!

Monday, September 26, 2011

Homemade Chalkboard Paint!

My kids have been bugging me about painting huge chalkboards on their walls.. I didn't really want the black chalkboards so I found this chalkboard paint recipe.. I dug out the left over paint for their rooms and voila..

I marked off a section with painters tape and put about 3 coats- drying and lightly sanding in-between coats.  I spray painted a scrap of chair railing and nailed it up for a chalk ledge.  The only difference you can see on the wall is a slight line where the paint gets thicker, otherwise, without the chalk, looks like the rest of the wall!


Homemade Custom Color Chalkboard Paint from Martha Stewart
Start with flat-finish latex paint in any shade. For small areas, such as a door panel, mix 1 cup at a time.
1. Pour 1 cup of paint into a container. Add 2 tablespoons of unsanded tile grout. Mix with a paint stirrer, carefully breaking up clumps.
2. Apply paint with a roller or a sponge paintbrush to a primed or painted surface. Work in small sections, going over the same spot several times to ensure full, even coverage. Let dry.
3. Smooth area with 150-grit sandpaper, and wipe off dust.
4. To condition: Rub the side of a piece of chalk over entire surface. Wipe away residue with a barely damp sponge.

Have fun and post your results!!  We would all love to see them..

Sunday, September 25, 2011

Paint Can Halloween Buckets!

The girls were getting tired of their Halloween bags they have been using for the last 10 years, so we got creative with some paint cans from Home Depot.. Here is what we came up with!


 It was SOOO easy!  We took empty paint cans we bought at Home Depot for about $4, some Halloween print paper and modge podge.  When we finished, we hot glued some googly eyes and added a ribbon.. Cheap, easy and cute!

Thursday, September 1, 2011

Sisters' Gourmet Brownies in Dubai....

We received this link today (to another blog), and thought it was fun and quite interesting! We at Sisters' Gourmet have a distributor in Dubai that sells our products to some of the local gourmet stores. Because we don't do a LOT of international business, we haven't thought through some of the translation/cultural issues that apparently we need to address. In this "story", you will see what I am talking about! Enjoy!

**above photo courtesy of (my niece) Rebekah L Photography

http://www.blogger.com/post-create.g?blogID=2841955073665646773


Granny's Disappearing Chocolate Cake

Our Grandma was a fabulous cook! As she got older, we tried to get her to write down as many recipes as possible so they wouldn't be lost forever. This cake was always a family favorite, so of course, we got the recipe. It's been over 10 years since Grandma passed away, but I still think of her every time I make the cake.

The problem was that she wrote it down wrong (but I didn't know that until last month)!!! So every time I made it, I wondered why I had such differing results. Sometimes it seemed to work out ok, but other times, it would just fall in the middle. Finally, I decided to do some research and see what I could find. Because Grandma always called it "Hershey's Disappearing Cake", I was able to find the original recipe on the internet, along with the following note, "We found this recipe in a magazine at a doctor's office where my wife discovered she was pregnant over 19 years ago. It has become our favorite recipe." Finally, I was able to see where Grandma had copied the recipe wrong. She had written 1 1/4 cups of flour, instead of 1 3/4 cups! Now, it is truly our favorite recipe, since we can make it without fail - literally!

1/4 cup butter
1/4 cup shortening
2 cups sugar
1 tsp vanilla
2 eggs
3/4 cup cocoa
1 3/4 cup flour
3/4 tsp baking powder
3/4 tsp baking soda
1/8 tsp salt
1 3/4 cup milk

Grease a 9x13 pan. Cream butter and shortening, then add sugar and vanilla until fluffy. Blend in eggs. Combine cocoa, flour, baking powder and soda, and salt in a bowl. Add milk and flour mixture alternately to batter. Blend well and pour into prepared pan. Bake at 350 for 30-35 minutes, or until cake bounces back when touched. Cool for 10 minutes, then spread the warm chocolate frosting (recipe below) on the cake.

Granny's Chocolate Frosting
1 cup semi sweet chocolate chips
3 TB butter
1/4 cup water
1 tsp vanilla
2 1/2 cups powdered sugar

Mix first 4 ingredients in saucepan over low heat, stirring occassionally until smooth. Add powdered sugar and beat until smooth. (at this point, sometimes I transfer the frosting to my Kitchen Aid for mixing, so that the frosting will be really smooth and creamy, or you could just use a hand mixer in the saucepan).

Tips: You want this frosting to be a little "runny" when you spread it on the cake. As it cools, it will harden - sometimes to the point of fudge! So, I often add a tablespoon of milk before spreading it on the cake. That keeps the frosting a little softer after cooling. Either way, it is delicious!!

Friday, August 26, 2011

Tangy Chicken BLT Sandwiches

Yes, it's sandwich time at our house again, but it is summer - and it's 95 degrees outside today! I thought I had see a recipe like this online, but when I went to make these yummy sandwiches today, I couldn't find it anywhere, so I was on my own. It's super easy to put together and so delicious! Don't talk yourself out of the sauce - it truly makes this sandwich special.

I made these sandwiches on 2 medium sized french bread loaves (actually labeled "sweet italian bread" at Kroger). Then, each was cut into 3 servings for a total of 6 servings. Of course, you can make it any size, but this recipe will give you a place to start....

You will need:
2 french bread loaves, sliced lengthwise in half
1 fully cooked rotisserie chicken, sliced
12 slices of bacon, cooked (I baked mine at 400 for about 15 minutes)
a few slices of lettuce, washed
2 tomatoes, sliced
2 TB mayonnaise
2 TB ketchup
salt and pepper to taste

Mix equal amounts of ketchup and mayo (about 2 TB each) and set aside.


Put sliced bread under broiler for about 3 minutes or until just starting to brown, then remove from oven.

Layer bottom slice of bread with bacon, chicken, lettuce, and tomato. Sprinkle salt and pepper on tomatoes. Generously spread sauce on top layer of bread, then lay on top of sandwich. Slice into desired serving sizes and enjoy!


Thursday, August 25, 2011

S'more Cookie Bars!


I came across these on lovinintheoven.com and had to try.. they are even better than they look!!

S'More Cookie Bars
Ingredients:
  • 1/2 cup butter, room temperature
  • 1/4 cup brown sugar
  • 1/2 cup sugar
  • 1 large egg
  • 1 tsp vanilla extract
  • 1 1/3 cups all purpose flour
  • 3/4 cup graham cracker crumbs
  • 1 tsp baking powder
  • 1/4 tsp salt
  • 2 king-sized milk chocolate bars (e.g. Hershey’s)
  • 1 1/2 cups marshmallow creme/fluff (not melted marshmallows)
Directions:
  1. Preheat oven to 350°F. Grease an 8-inch square baking pan.
  2. In a large bowl, cream together butter and sugar until light. Beat in egg and vanilla. In a small bowl, whisk together flour, graham cracker crumbs, baking powder and salt. Add to butter mixture and mix at a low speed until combined.
  3. Divide dough in half and press half of dough into an even layer on the bottom of the prepared pan. Place chocolate bars over dough. 2 king-sized Hershey’s bars should fit perfectly side by side, but break the chocolate (if necessary) to get it to fit in a single layer no more than 1/4 inch thick. Spread chocolate with marshmallow creme or fluff. Place remaining dough in a single layer on top of the fluff (most easily achieved by flattening the dough into small shingles and laying them together).
  4. Bake for 30 to 35 minutes, until lightly browned. Cool completely before cutting into bars.

Makes 16 cookie bars.

Monday, July 25, 2011

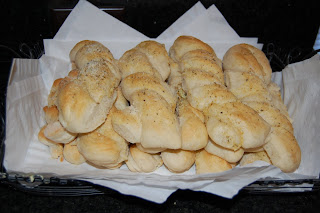
Garlic Breadsticks

Easy Breadsticks!


1 1/2 c. warm (105-115 degrees) water
1 Tbsp. sugar
1 Tbsp. yeast
1/2 tsp. salt
3-4 1/2 c. flour


In a large bowl, combine water, sugar, and yeast. Let stand for 10 minutes or until yeast is bubbly.  

Add salt and stir. Add 1 1/2 c. flour and mix well. Gradually add more flour (usually between 3-4 cups,) until dough starts to pull away from the sides of the bowl and it barely sticks to your finger.

Spray a glass or metal bowl with cooking spray or coat with oil and place dough in the bowl. Cover and allow to rise for 45 minutes or until doubled in bulk.

Remove from bowl and place on a lightly-floured surface. Spray a baking sheet with cooking spray. Roll into a rectangle and cut into 12 strips with a pizza cutter.

Roll out each piece of dough into a snake and then fold in half and twist the dough. Place on baking sheet and repeat with remaining pieces of dough.  Put them a few inches apart unless you want them to be connected when baked.


Cover pan and allow dough to rise for another 30 minutes. When there's about 15 minutes to go, preheat your oven to 425. When done rising, bake for 10-12 minutes or until golden brown. Rub some butter on top of the breadsticks  and sprinkle with garlic mixed with parmesan and parsley. For a sweet treat you could sprinkle them with cinnamon sugar. Enjoy!


Thursday, July 14, 2011

Men vs. Women BBQ Wars...

So I sent this innocent (but hilarious) e-mail to a few guys in our family, my brother in law being one of them.. here is the e-mail I sent him and below that is his response.. enjoy!


BBQ RULES
We are about to enter the BBQ season. Therefore it is important to refresh your memory on the etiquette of this sublime outdoor cooking activity. When a man volunteers to do the BBQ the following chain of events are put into motion: 

Routine... 

(1) 
The woman buys the food. 

(2) 
The woman makes the salad, prepares the vegetables and makes dessert. 

(3) 
The woman prepares the meat for cooking, places it on a tray along with the necessary cooking utensils and sauces, and takes it to the man who is lounging beside the grill - drink in hand. 

(4) 
The woman remains outside the compulsory three meter exclusion zone where the exuberance of testosterone and other manly bonding activities can take place without the interference of the woman.

 
Here comes the important part: 


(5) THE MAN PLACES THE MEAT ON THE GRILL.

 
More routine... 

(6) 
The woman goes inside to organize the plates and cutlery. 

(7) 
The woman comes out to tell the man that the meat is looking great. He thanks her and asks if she will bring another drink while he flips the meat.

 
Important again: 

(8) 
THE MAN TAKES THE MEAT OFF THE GRILL AND HANDS IT TO THE WOMAN.

 
More routine... 

(9) 
The woman prepares the plates, salad, bread, utensils, napkins, sauce and brings them to the table. 

(10) 
After eating, the woman clears the table and does the dishes.

 
And most important of all: 

(11) 
Everyone PRAISES the MAN and THANKS HIM for his cooking efforts.
 
(12) 
The man asks the woman how she enjoyed her 'night off,' and, upon seeing her annoyed reaction, concludes that there's just no pleasing some women.

 Rob's response...


Suzy,


Heres how the guys see it.

One Month before the party (90 degrees out):

The man fertilizes the lawn
The man pressure washes the house and the deck
The man touches up the paint
The man fixes the pump on the pool and replaces the filters
The man mows the lawn
edges the lawn, trims the lawn, blows the sidewalks and driveway

Three weeks out (93 degrees out):

The man refinishes the deck
The man pressure washes the driveway
The man trims the shrubs
The man sweeps and shocks the pool
The man refreshes the mulch
The man sprays the yard for weeds
The man mows the lawn
edges the lawn, trims the lawn, blows the sidewalks and driveway

Two weeks out (97 degrees out):

The man weeds the flowerbeds
The man pressure washes the pool furniture and the pool deck
The man mows the lawn
edges the lawn, trims the lawn, blows the sidewalks and driveway

3-4 days out (record breaking heat since 1905):

The man mows the lawn
edges the lawn, trims the lawn, blows the sidewalks and driveway
The man fills the propane tanks
The man sprays for bugs and ants.
The man cleans the grill and the grill tools.
The woman goes shopping... for food and plates and clothes and shoes and purses
The woman assigns stuff for all of her friends to bring

Party day:

The man stands outside in the 99 degree 100% humidity weather and cooks over a 400 degree grill for 2 hours.
The woman stays in the air conditioned house and tosses salad.
Everybody else eats.
The man eats a cold hot dog and chicken breast with a diet coke.  The brats and burgers are gone.  The salad is wilted and the fruit is warm.  The regular coke is gone.  The only chips left are fat free veggie crisps.
The man gets in the pool and enjoys the rest of the day.

What a great party.

It is conceivable in some cases the the word Man above may not be referring to the man of the house, but possible some other man who was picked up at QT that morning, but the man of the house still gets the credit.  After all he did go pick up the man and pay the man and take the man home.  Us men have to stick together.

Rob

Wednesday, July 6, 2011

Toasted Ravioli!!

If you have never tried fried ravioli- you are missing out!  We grew up in St. Louis where it is a local favorite, but lots of our country hasn't caught on that everything fried is better... It is super easy and worth the calories!

Toasted Ravioli
1 bag of frozen beef ravioli (you can use cheese, but then it is just fried cheese!)
3-4 eggs, beaten
Italian breadcrumbs
Oil of choice

Heat the oil in a frying pan.  Put eggs into medium to large shallow bowl.  Do the same with the breadcrumbs.  Dip frozen ravioli into eggs then breadcrumbs and fry in hot oil until brown on both sides.  Drain and serve with favorite marinara and parmesan cheese!

Saturday, June 25, 2011

Baked Ham and Cheese Sandwiches

Since the first time I had these little sandwiches (at a tennis match last year), I fell in love with them! I like to try different meat/cheese combinations each time, but will say that I like all of them, so I can't recommend a favorite yet.

Today's version is using Oven Roasted Turkey and Cheddar Cheese - once again....delicious! Also, today I used the Honey Wheat rolls, and we loved them!

Combine these first 5 ingredients in a saucepan and cook over low heat just until combined.
1 stick butter
1 tsp. worcestershire sauce
2 Tbsp. honey mustard
1 tsp. onion powder
1 tsp. brown sugar

You will also need:
2 packages of King's Hawaiian Rolls OR small dinner rolls in foil pan
10-12 slices of cheese
1 lb. thinly sliced meat

Place rolls on large baking sheet. Slice each package of rolls HORIZONTALLY. Remove the top layer of bread and pour 1/4 of the sauce over the bottom layer, using a brush to spread it evenly across the surface. Cover with about half of the meat and cheese. Replace the top layer of bread. Pour 1/4 of the sauce over the top layer of rolls. REPEAT with second package of rolls.

Bake at 350 for about 15 minutes. Cut apart and serve. Enjoy!

*note - If making for a large crowd with appetizer portions, I prefer to use the foil package dinner rolls (found in the bread aisle). When making lunch for my family, we use King's Hawaiian Rolls because they provide a little heartier meal.


Thursday, June 23, 2011

Summer Squash Bread

Each year, we plant a small garden in our backyard. By we, I mean my husband. I watch it from the window - the planting, growing, and harvesting. But, when he brings me beautiful veggies like these, I want to start experimenting!

Maybe you've never heard of summer squash bread, but just think about zucchini bread - it's the same thing!!! This year, we planted summer squash (also known as crookneck squash) in our garden, so I need to start working on recipes to use the squash as it ripens. Unfortunately, I let these first ones ripen too much, so they are large and full of seeds. I ended up removing most of the seeds as I grated the squash for this recipe, but normally it isn't necessary.


Here's the recipe to make 2 loaves:


3 eggs, beaten
2 cups sugar
1 T. vanilla
1 T. cinnamon
½ cup applesauce
½ cup vegetable oil

Add all of the above ingredients in a large bowl, and mix until blended.

Add 2 cups grated summer squash. (It is not necessary to peel the squash, just wash and grate. If you want to take the time to remove the seeds, then go ahead, but it isn’t necessary unless you have a LOT of them.)

After blending again, add:
1 t. salt
1 t. baking soda
½ t. baking powder
3 cups flour (I add one cup at a time and mix well before adding more)Pour into 2 greased loaf pans, and bake at 325 for about 55-60 minutes, or until golden and set. Cool for at least 15 minutes before removing from pan, then slice.

My favorite way to eat any sweet bread is with cream cheese! Enjoy!

Monday, May 30, 2011

Cupcake Obsession!!

My kids say that I am obsessed with cupcakes!!  Well, I say why the heck not!  I thought I would post some pictures with ideas so you can either try these or take some of my ideas and expand on them!  Would love to see some of them if you come up with some new varieties!

I have to say that after trying several home made recipes for cupcakes, I have decided unless it is a crazy flavor that I can't buy in a box, I am sticking to the box! They are so much lighter and fluffier and most people who try both prefer the box mixes!

I have found that if I use a simple buttercream recipe, I can add just about anything to it and it tastes great!

Buttercream Icing:
1 stick butter
1 tsp. vanilla
3 C Powdered sugar
milk

Cream first 3 items together in mixer and add milk as needed for the proper consistency.

Chocolate Buttercream- add 1/2 cup unsweetened cocoa to above recipe.

The easiest way that I have found to ice cupcakes is to get some disposable cake decorating bags.  They are just a heavy triangle shaped bag.  I roll the top over and fill up the bag.  Cut about 1/2 inch off the tip and pipe the icing on!  It is that easy and no messy tips or bags to clean.  Just throw away the bag! If you want it to look a little more formal, you can use a decorative tip in the bag.

Now that you have the two basics- you get to get creative!

This assortment has my chocolate peanut butter cupcakes, rocky road, and strawberry vanilla bean.


For the Chocolate Peanut Butter cupcakes, I add about 3 TBSP cream peanut butter to the buttercream icing.  Top with chopped Reeses Peanut Butter cups and enjoy!  You can also drizzle melted peanut butter or melted peanut butter chips for a more elegant look.

The Rocky Road cupcakes just have the chocolate buttercream with marshmallows and chopped nuts (I prefer pecans or almonds).

The strawberry vanilla bean is a vanilla cupcake that I scraped some vanilla beans into.  Do the same with the vanilla buttercream and top with fresh strawberries.


Sometimes I am looking for stuff to use up in my pantry.. as is the case with the above cupcake.  We took some Girl Scout Samoas along with some toasted coconut and topped the chocolate/chocolate cupcakes!  YUM!


 Last but certainly not least are my personal favs!!  Triple Salted Caramel Cupcakes!  Even the name sounds divine!
These started out with a vanilla cupcake or I have seen recipes for caramel cupcakes online..  Topped with a caramel sauce that I made- I will find and post the recipe if anybody is interested.. it was a caramel candy recipe that I just didn't thicken all of the way.  I put that into a squirt bottle and pushed the tip into the cupcake and filled.  I then topped with the above buttercream icing that I added some of the caramel to.  I also added a tsp. of sea salt.  I then drizzled the tops with more caramel and a light shake of sea salt.  My daughter got creative and talked me into making the sugar scuptures on top!  They didn't taste as good as they look, so probably a bit more trouble than they are worth!  This cupcake is to die for!


Monday, May 23, 2011

Chicken and Garlic Pasta

This dinner was so easy I have to write about it!

A few days ago, I bought a large package of fresh chicken breasts. Today, I realized that if I don't cook them soon, I'll have to throw them away. So, this morning, I just put them in a crockpot, then filled it to the top with water. I added a little salt and pepper and cooked on low all day. While the noodles were cooking (below), I took out some of the chicken and chopped it.

This evening, I cooked a pot of pasta (doesn't really matter what kind). After cooking, I drained it, then added some olive oil, maybe about 1/4 cup. I then added about 3 large cloves of fresh minced garlic, some sea salt, cracked pepper, and basil. Finally, I mixed in the chicken. Our family loves parmesan cheese, so we topped it off with a generous sprinkling, then served.
We all really liked it, and the kids had seconds. However, because it was an experimental recipe, we decided that we would make a few changes next time. We tried a few things, and realized it needs a little chicken broth (which we added from the crockpot of chicken that had been cooking all day). We also tried adding just a small amount of sour cream and thought that was very tasty, too.

The bottom line is this is a versatile starting point for many variations, depending on what you have in your kitchen at dinner time! Enjoy!

Friday's Couponing Adventure

I know - this is kind of random, but I'm so proud of my couponing skills! My friend, Sherry, taught me how to make the most of coupons by combining them with sales. I'm still learning, but today was one of my better days, so I had to take a picture and show you what I got...

Total: 7 boxes cereal, 10 boxes pasta, 2 eight bar packs of soap, 3 two bar packs of soap, 11 bottles of propel water, 7 bottles of Nivea men's body wash, a package of sliced cheese (for which I forgot to use my coupon!!), a $7.00 pacakge of frozen chicken breasts that my son has been asking for and for which I had no coupon, and some grapes.


Drum roll please.................grand total $13.00!!!


Now, I suppose my next post should be a pasta recipe...

Wednesday, May 18, 2011

Snickerdoodles

These snickerdoodles are absolutely the best ones you will ever eat!  I would recommend doubling the recipe~ they are going to go fast...


1/2 C butter, softened
1/2 C shortening
1 1/2 C white sugar
2 eggs
2 tsp. vanilla
2 3/4 C flour
2 tsp. cream of tartar
1 tsp. baking soda
1/4 tsp. salt


cinnamon 
sugar


Preheat oven to 400 degrees.  Cream butter, shortening, sugar, eggs and vanilla.  Blend in the dry ingredients.


I just have to throw in here that I don't know how I have lived my entire life thus far without this spatula beater for my Kitchenaid!!  I found it at a kitchen store in an outlet mall but have seen them other places- it is an absolute must-have if you own a Kitchenaid.. now back to the recipe! :)


Shape dough into rounded balls (I use a cookie scoop so it is really quick..)  Roll in cinnamon sugar mixture.  Place about 2 inches apart on cookie sheet.


Bake for 8 to 10 minutes or until set.  Remove from cookie sheets immediately or they will start to stick!


Enjoy~ 

Tuesday, May 17, 2011

Fresh Mango Salsa!

This is the perfect Summer salsa!  It is fresh and easy to make~ I like it with grilled chicken on a flour tortilla, but the possibilities are endless!  Enjoy...


2 ripe chopped mangoes
2-3 chopped tomatoes
1/2 C chopped cilantro
juice of one lime
1-2 diced jalapenos (try with one first!)


Mix all ingredients together and refrigerate for 3-4 hours before serving!  Makes about 3 cups.

Monday, May 16, 2011

Brownie Trifle

Last weekend, I offered to make brownies for a party. Once the brownies were baked, I decided to get a little more creative! One of my favorite things to do with brownies is make them into a trifle. The best thing about trifle is that there are NO RULES! Anything yummy and sweet will probably work! Below is my "basic" recipe, but have fun making it your own.

1 21 oz. brownie mix, prepared
4 oz. cream cheese
1 cup marshmallow cream
8oz container frozen whipped topping
1 1/2 cups milk
3 oz pkg instant pudding mix (any flavor)
1/2 jar caramel topping

Layer #1 - Start by baking the pan of brownies - any flavor will work, but of course, my favorites are the Sisters' Gourmet Chocolate Overload Brownies. Then, crumble them and put about a third in the bottom of a trifle dish or a 9x13 pan or whatever you want to useFor layer #2 - Beat cream cheese, then add marshmallow cream until blended. Stir in 1/2 of the whipped topping. Spread over the crumbled brownies.

Layer #3 - Pour caramel topping evenly over the creamy layer.

Layer #4 - Combine pudding mix and milk until thickened. Stir remaining whipped topping into pudding. Spread about 1/2 of this over the caramel.

Layer #5 - Crumble about 1/3 of the brownie pieces over the pudding layer.

Layer #6 - Spread the rest of the pudding over the brownies.

Layer #7 - Sprinkle the rest of the brownie pieces on top.

Layer #8 - If I have extra whipped topping, I sometimes put a little more on the top. I've also finished it off with chocolate shavings.

It can be served right away, or refrigerated for a few hours. I love it the most on the second day, but it doesn't look as pretty. This will serve about 12 -15! Enjoy!

Saturday, May 14, 2011

Southern Buttermilk Syrup

Since we are on the topic of breakfast, here is a recipe for "Southern Buttermilk Syrup".. Once you try, you won't want maple syrup anymore!

Southern Buttermilk Syrup

3/4 cup Buttermilk
1 1/2 cups sugar
1/2 cup butter (not margarine)
2 T corn syrup
1 tsp baking soda
1 tsp vanilla

Combine buttermilk, sugar, butter, corn syrup and baking soda in a large pan. (it will bubble up, so a small saucepan will NOT work!)


Bring mixture to a boil and reduce heat to low.  Cook, stirring frequently, for 8 or 9 minutes or until it is a golden brown.  Remove from heat and stir in vanilla.  Enjoy!

Wednesday, May 11, 2011

Caramelized Bacon

Several years ago, at my niece’s wedding reception, I was introduced to caramelized bacon. The reception was held at a beautiful country club, and as guests were mingling, the servers were offering plates of these delicious bites of bacon. Since then, I have been experimenting with recipes and cooking methods so we can enjoy this treat at home. Following is my recipe – which is pretty close to perfection (if you ask my kids):

You will need:
1 lb of bacon
1 cup of brown sugar

That’s all. As for kitchen “tools”, I use my broiler pan, a cooling rack, and some sort of flat plastic container with short sides.

I won’t lie to you - this can be a bit messy. So, I do a couple of things at the beginning to make the clean-up go quickly.

1. cover broiler drip pan with foil.
2. put foil or wax paper under a cooling rack (for drips)


OK let’s get started…. Preheat your oven to bake at 400. Pour the brown sugar into a flat container with sides. Cut the entire pound of bacon in half – just right down the middle.

Take each slice of bacon and press it into the brown sugar, covering each side. Then, lay the sugared bacon on the top rack of broiler pan – touching each other is fine.


Bake for about 16 minutes, flipping the slices over about halfway so they get about 8 minutes on each side. I prefer them very crispy, so I may watch closely and bake an extra few minutes. In this picture, I've been rotating some new ones onto the pan as others have been cooked and removed from the pan. The darker ones are ready to come off, but the others will need to cook longer.


Remove from broiler pan, and place each slice on baking rack while still hot. Let cool for about 10 to 15 minutes, then enjoy! You can also store in the refrigerator for up to a week, but they are best served at room temperature.

Wednesday, April 27, 2011

Welcome!

We have a lot to say, and (until now) clearly not enough people listening.   So, welcome to the SistersGourmetBlog where you never know what we'll post!


In the meantime, we want you to know a little more about us....


The Story of Sisters’ Gourmet

Sisters Gourmet, a premier manufacturer of gourmet desserts, began like many other gourmet foods companies- in a home kitchen. President, Lisa Sorensen, tells of a visit from her sister, Suzy, back in 1995.

“We had been selling homemade gift baskets at local craft shows for a while when we had a great idea. We both loved baking, and remembered how as children, we spent hours in the kitchen with our mother, baking for family and friends.

“Our goal was to make baking fun, a way to still enjoy an indulgent, homemade taste, yet in a convenient one-bowl recipe. We decided to package some of our favorite recipes layered in Mason jars, covered with whimsical fabrics. As we worked together that night in my kitchen, spending hours poring over recipes, Sisters Gourmet was born.”
  
Now, sixteen years later, Sisters Gourmet’s one-bowl recipes continue to make baking fun for all. Along the way, the company has grown from offering two varieties in Mason jars to offering a wide array of decadent gourmet desserts across several different product lines in numerous packaging options.  Today, the company caters to its thousands of customers around the world.

Yet despite the growth, much pride is taken in knowing each mix is still layered by hand, offering each customer a unique and individual way to conveniently enjoy a gourmet taste from the comfort of their home. As the sisters often like to say, “We make it easy for you to make it homemade.”